Sunday, March 30, 2014

Making Your Own Belgian Linen Panels


The Plein Air Convention in Monterey is coming up soon, and I've found myself making more linen panels in preparation. Here's a simple tutorial for making your own.

Many companies make some great linen panels, but they're too expensive for me. While the initial cost of buying a full roll of linen can be steep, making your own panels will be much less expensive in the long run.

Materials:

-Claussen's Oil Primed Linen (I use the #12 style)
-MDF or Masonite boards, cut to size (Having a couple small sizes helps you minimize scraps)
-Matte Medium, Miracle Muck Glue, or Elmer's Glue
-Cheap bristle brush
-Soft Rubber Brayer (Speedball brand. Used for printmaking)
-Rubberized Cutting Mat
-Sandpaper
-X-Acto Knife
-Pencil
-Scissors


Begin by lightly sanding your wooden panels. I like to make sure the edges are cleaned up and any burs are removed. Run the sandpaper across the side to be glued as well, to provide better adhesion for the glue.

Next, lay your roll of linen out on the floor, primed side up. Place the panels on top, and trace all around with a pencil. Make a little bit of extra room all the way around (1/8 of an inch is plenty). Cut out with scissors.


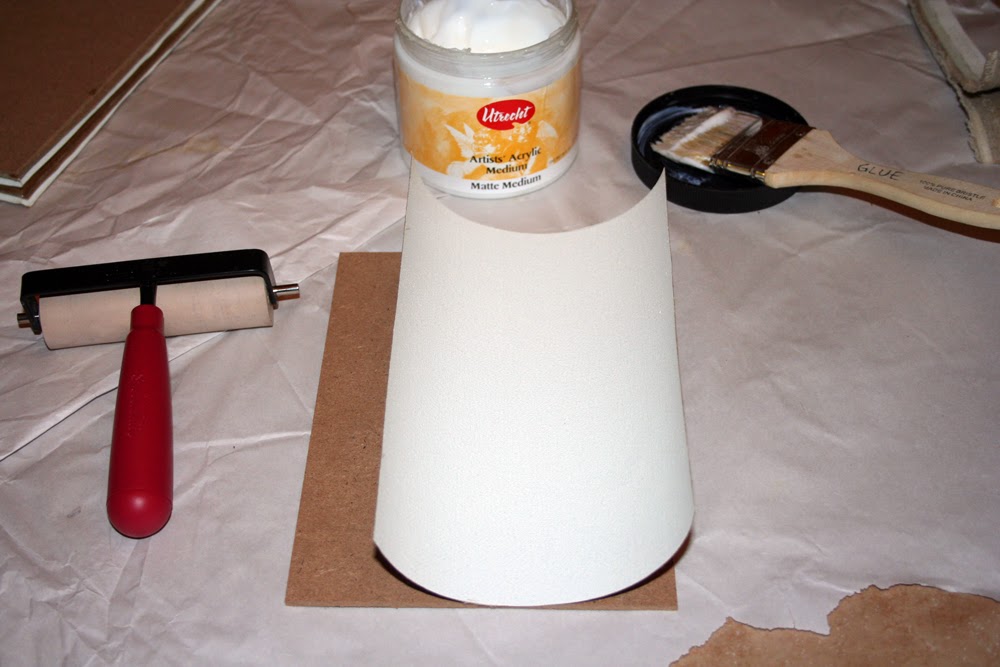
Next, gather your brush, medium/glue, and brayer.


Brush a thin layer of glue all over the wood. It took me a dozen panels to find out the magic amout of glue to use. Too little glue and the linen won't stick. Too much glue and it oozes out the sides and makes a mess.


With the panel coated in glue, carefully place the unprimed side of the linen down on to the panel. Try to line it up correctly on the first try. If you peel it up you will have to put down some more glue.

Take the brayer and firmly press down, rolling from the center outwards. Make sure to really get the edges to stick down. If you don't use enough glue and pressure the edges have a habit of peeling away from the board.


Flip your panel upside-down and inspect the edge. Make sure the linen is not peeling up anywhere.

Notice a little seam of glue on the edge. The panel below has just the right amount of glue. The edges will stick down well. Too much glue will ooze out and make a big mess on your working surface (and potentially get on the primed side of your linen panels!)


Take all of your panels at this stage and stack the like-sizes together. Place a couple heavy books on each stack. Let this sit overnight to dry.

Once the panels have dried, take your rubberized cutting mat and an X-Acto knife. Place the panel upside down on the cutting mat. With firm pressure and using the edge of the wood panel as a guide, cut away all the extra linen.


Panels can sometimes warp very slightly, because the linen can shrink as it dries. If this happens, place the panels face-to-face and leave underneath a couple heavy books for a few days. Time is better than pressure when it comes to de-warping wood.

After trimming off the extra linen, inspect each panel. If you have an edge or corner peel up because you didn't use enough glue, it's ok! Peel the corner back just a little bit, and put on some extra glue with a small brush or palette knife. Run the brayer over the trouble spot a couple more times until it really sticks down. Leave the panel under a book for another day.


 And there you have it. Hopefully this little tutorial can help you make some nice panels. Happy painting!


Wednesday, March 26, 2014

New Studio Work and Plein Air piece

Here's a quick shot of what's currently on my easel. Since taking the photo, I painted a little more reflected light in the big central rock, and I did some light glazing on the cactus spines (brightest spots). I think this one's ready for a frame.

It's a poor photo taken with my phone, but it'll have to do until the painting is dry and I use my camera.

24x30 inches.


Last up is a quick plein air piece I painted in Papago Park. I wanted to study the reflected light in these rocks. Papago has a lot of interesting rock formations. I'd really recommend painting there if you are ever in the Tempe/Scottsdale area.

This was also a good lesson in blurring/muting the background landscape in order to make the foreground rocks come forward.

9x12 inches, oil on belgian linen.

Sunday, March 16, 2014

Plein Air Events (Part 2)

This post is about a Plein Air event in Casa Grande, Arizona, which I participated in back in February.

After getting three 9x12 panels stamped, I made my way down to Florence st, where a lot of small family-owned shops are located.

As I was setting up to paint, the local shop owners started to arrive to open up their stores for Saturday business. One shop owner came out to sweep her front walkway, other owners shouted greetings from across the street, waved, or said good morning. Each owner put out an American flag on the edge of the walkway. It was almost surreal, in a way. I thought this kind of America was long gone, eaten up by the large corporations.

Here's the first painting I did that day, clad in a really cheap frame ($6 from Jerry's, if I remember right). The roof was totally in shadow when I started painting, but I had hoped that as the sun would rise it would highlight the edges. It really gave the architecture some extra definition.


After finishing and framing the first painting. I went down the walkway a little bit. I actually painted at the far end of that strip of shops, right about at where the smaller figure's collar is.

The street has a lot of neat looking bronze lampposts, and I wanted to paint one. I also found a potted plant on the curb, which had some great cast shadows (and some reflected light on the shadowed side of the pot). This was my favorite painting of the day. It's pictured here, still in my Guerrilla Painter box.


After a beer over at Native New Yorker, the judging was over. I was really happy to win Best of Show and the $1000 purchase award for my street scene. Prize aside, I had a great time painting in some of the best weather Arizona has to offer. I enjoyed chatting with the local shop owners and passers-by. All in all it was a great day.

Saturday, March 8, 2014

Plein Air at the Grand Canyon (and one in Flagstaff)

Just got back from a quick day trip to the Grand Canyon. I painted two pieces on location, both are 9x12 inches.

I've been using a new palette, as well. I figure I'll mention it beforehand. I chose these colors based on mixing compliments to neutralize, rather than using earth tones...

Titanium White
Cadmium Yellow Light
Cadmium Orange
Cadmium Scarlet
Crimson Lake (Holbein brand. Alizarin Crimson would work the same)
Dioxazine Purple
Ultramarine Blue Deep (Holbein)
Cobalt Blue
Viridian Hue (Holbein brand. It's a lot stronger than regular Viridian, since it's made with Phthalo Green)
Brilliant Green (Utrecht)
Yellow Green (Utrecht)

I don't normally carry really vibrant greens on my palette; in fact Viridian is typically the only green I use. But lately I have been discovering how useful it is to have a selection of really vibrant greens. It's always easy to knock the intensity back with the oranges, reds and violets on the palette. It's also really convenient to add touches of the vibrant green to a mixture, in order to slowly bring it up in intensity.

With trees especially, I like making them much greyer than I have to, and then selectively brighten areas. It's very easy to bump a color's saturation when you have a nuclear-strength green available. The key is to never use those greens on their own though, because otherwise your painting will look like a golf course in a cartoon. The same could be said of any other vibrant color, I suppose.

Anyway, on with the show. First up was on the south rim, looking southeast. This is my favorite of the two. I was able to spend a little more time on it. I found a quiet ledge away from the tourists and painted away.


The next one was painted partway down the Bright Angel Trail. This one was a little rushed, and I wish I could have spent another hour on it. The sun was sinking, though, and we had to hike back and drive back to Flagstaff before dark.

My main goal with the second one was to study the value difference between the nearest cliff (in shadow), and the very light, distant cliffs.


Lastly we have a painting I knocked out yesterday after a couple mile hike outside of Flagstaff. Sadly there is no snow to be found outside of Humphrey's peak. I took this photo with my phone, so the quality is not the same as the others. 


Wednesday, March 5, 2014

Plein Air Events (part one)

Once again I've been neglecting my blog. But regardless of the lack of posts, I have been painting like crazy! In addition to some new studio paintings (which I will share in a future post) I have been doing a lot of plein air painting.

First up is the Plein Air Competition hosted by the City of Glendale, Arizona. The event was held Feb 8th as part of their Chocolate Affaire Festival.

Check-in was at 8am and I got three of my blank linen panels stamped on the back (I make my own panels with Claussen's oil primed linen. I have a tutorial planned for those too).

Downtown Glendale has a lot of century-old bungalows, many of which have been converted into small shops. My first painting of the day was of a blue house (I think the shop was called the Blue House Botique?).


When I set up to paint this, I noticed that my jar of thinner had leaked all through my backpack. There was just a little bit of "sludge" left at the bottom of the can. So, I had to paint this one without cleaning my brushes. I had to make sure to save a couple clean brushes to use for white later. Good thing I brought plenty of brushes!

After knocking out this painting I drove back home to Tempe. I refilled my thinner container, and I decided to stop by the art store to pick up a new display easel and a couple frames. I hurried back to Glendale...

I picked up a root beer float at Papa Ed's Ice Cream, and as I ate it in their garden I noticed an old wooden door leaning up against a tree. There were some nice cast shadows on it from a tree, and I asked for permission to paint there.


The great thing about painting outdoors, especially in public places, is that people are curious and like to watch. Especially kids. I would ask all of them if they were artists, and most kids reply with a definite "yes!". I had a great time. Hopefully some of the onlookers were inspired to create something.

I framed both paintings and took them back for the judging. I was really happy to win second place with my door painting. It also consisted of a $500 purchase award! Not too shabby!

All in all it was a great Saturday, despite the trouble with my container of paint thinner. Hard work pays off!

Coming up in part two: Plein Air in Casa Grande (And a "Best in Show" award)