Friday, October 31, 2014

Plein Air in Door County, WI

Last month I went to visit family in Door County, Wisconsin. I brought along my trusty 9x12 Guerrilla Box and paints. The leaves were just starting to change color, the weather was great, and the mosquitoes were thick. 

I brought my standard palette, which consists of: Titanium White, Cadmium Yellow Light, Yellow Ochre, Cadmium Orange, Burnt Sienna, Cadmium Red Light, Alizarin Crimson, Dioxazine Violet, Ultramarine Blue, Cobalt Blue, Viridian Hue (Phthalo green), 

The earth tones are a recent addition. I always tended to avoid them, preferring to mix my own neutrals with complimentary colors. While I still mix my own neutrals, I tend to use the Yellow Ochre and Burnt Sienna as a way to knock down a color's intensity. They are used only to "tweak" a mixture, and are never the bulk/starting point. 


"Hobie Cat" 8x10 inches


"Sunset over Snake Island" 6x8 inches


"Cave Point County Park" 8x10 inches


"Whitefish Dunes State Park" 6x8 inches


"Creek and Reeds" 9x12 inches


"Changing Leaves" 8x10 inches


"Shady Spot" 9x12 inches

"Spooner's Pond" 9x12 inches


Saturday, July 19, 2014

June/July Outdoor Paintings

Hi everyone. I've been trying to get outdoors as much as I can lately, though it is often tough to do in the Phoenix heat. You've got to wear light clothes, bring a hat, and plenty of water. Here are a dozen paintings from the Phoenix area (and a few from Sedona)


These two are a couple sky studies I painted 6/16/14 at Tempe Town Lake. 6x6 and 6x8 inches.


"The Old Flour Mill" is on Mill Avenue in Tempe. This was painted from the back side, partially up the Hayden Butte (ASU Mountain). To the right, not pictured, are the tall silos. The silos were reflecting the setting sun, casting a warm orange glow on the backside of the old equipment building. 6/27/14 9x12 inches.


Sunset at Papago Park. This was painted before the Monsoons started rolling in, when summer days are dry and cloudless. The red rocks have lots of big round holes and pits in them, which resemble clouds in a way. 6/28/14 9x12 inches.
Another late afternoon at Papago Park. Some great clouds were starting to develop, so I quickly sketched in this rock so I could start on a new painting. 7/3/14 6x8 inches

Some big clouds were starting to roll in from the east. I finished this 6x8 painting just in time, because a giant dust storm hit right as I made it back to my car:


One of Arizona's famous wall-of-dust storms. Close to zero visibility in one of these things. 7/3/14


I went back to Papago a few days later. There was another dust storm warning, so I wanted to paint fast. 7/7/14 6x6 inches.


As the sun got lower there were some really brilliant clouds. This one ended up looking like an elephant, with rain for legs. 7/7/14 8x6 inches.


A great way to beat the heat is to head up to higher altitudes. The highs in Sedona were in the cool 90's. This was painted on one of the Thunder Mountain hiking trails. Chimney rock was to my left (west) and this is looking north. 7/12/14 6x8 inches.


We stayed at the Sky Ranch Lodge, which is located up on a mesa next to the airport. They have a great view. 7/12/14 10x8 inches. 


Also painted from the top of the mesa. The sun got lower, and the clouds and red rocks started glowing. 7/12/14 6x6 inches.


It started storming and I was able to find some shelter underneath a tent (the hotel here hosts weddings, and it was some small tent for receptions). I was able to get the last rays of sunlight before the clouds took hold. 7/12/14 6x8 inches.


Thursday, May 8, 2014

6 new studio paintings

I have 6 new studio paintings to share. The first four were painted while attending a workshop at Scottsdale Artists School. 

These have all been painted with a limited palette of Cadmium Yellow Light, Cadmium Orange, Cadmium Red Light, Alizarin Crimson, Ultramarine Blue, and Phthalo Green, with the exception of "Catching Waves", which I painted using only Cadmium Yellow Light, Cadmium Red Light, Alizarin Crimson, and Ultramarine Blue.

I've also been experimenting with a new medium. It's a mixture of Galkyd, Gamsol, and linseed oil. I've been liking the working properties so far. More linseed oil will slow the drying time. It gets a little tacky after a short while, allowing me to apply several layers in one painting session. However it stays wet for a day or two, so I can still have time to go back and soften edges.


"Howard's Place" Oil on canvas, 12x12 inches


"The Old Fence" Oil on canvas, 9x12 inches [SOLD]


"Morning Glow" Oil on canvas, 12x12 inches [SOLD]


"Autumn Leaves" Oil on linen, 11x14 inches


"Catching Waves" Oil on linen, 16x20 inches


"Glowing Majesty" Oil on linen, 28x30 inches


Tuesday, April 15, 2014

My 9 Paintings From Monterey


The last three paintings are from Friday. I painted two of them at the Fisherman's Wharf in the morning. The last painting was at the Asilomar beach in the late afternoon. A busy day!

Thursday, April 10, 2014

Plein Air Convention (Part 2)

Well, the convention is over! All that's left is for Friday's "paint-out" at the Fisherman's Wharf in Monterey.

I attended some really outstanding demonstrations (in particular the demos by watercolor artists Stewart White and Andy Evansen.

I attended the Marketing Boot Camp on Tuesday-Thursday mornings and I have to say it was really informative. I took some detailed notes and I'm already itching to put some of these ideas into practice.

Anyway, here are my two paintings from yesterday and today:


This one is from the group paint-out in Carmel on Wednesday. A big cloud of fog was rolling in and was blocking out the sun, but it broke through in some places and was really illuminating. I'm going to have to paint this one bigger.

This one is from the group paint-out today in Point Lobos. Man, it was crowded. It was so much quieter when I came here before the convention started on Monday. It was also really grey outside today. What a better way to practice mixing grey colors than on a grey day? This is from the same spot I painted at on Monday, looking slightly to the left of the previous grouping of rocks. 


One of the vendors present at the convention was Michael Harding's Oil Colours. I had heard great things about his paints, but I avoided buying them online since I never had the opportunity to see them in person first. I picked up a selection of series 1 paints to try out (they gave me a couple freebies too), and I have to say I'm really blown away. These are outstanding. The paint has a nice, buttery feel to it, but still has tons of body (They even had a huge mound of yellow and green paint on a palette at their booth, with a palette knife sticking out of each. The paint is so thick you can sculpt it. I should have taken a photo).

Of the paints that I purchased, the colors I have tried so far are Titanium White, Yellow Ochre, Burnt Sienna, Raw Umber, and Ultramarine. All four of those have left me really impressed. I"ll be putting the remaining colors on my palette tomorrow. 

Well, that's it for now. I'll be waking up early to paint at the Fisherman's Wharf tomorrow. I want to try and get 4 paintings tomorrow, since I'll have a full day. That will bring my total painting haul to 10. That would be a great way to cap off my trip!


Tuesday, April 8, 2014

Plein Air Convention (Part 1)

Hello from Monterey!

It's day two of the Plein Air Convention and I'm having a good time seeing demos and meeting great people. I'm also happy to post four new paintings.

I drove from Phoenix on Sunday with a car full of paints and blank linen panels (and a cooler full of Coke). I arrived late afternoon in Monterey, with just enough time left in the day to paint this:


I really like painting the streams of water running down the backside of the rocks. This was on Asilomar beach.

Day Two, Monday, was spent in Point Lobos. A lot of Plein Air painters were enjoying the sun and painting (the surplus of black flies, however, were not enjoyed).


My first painting of the day was at the last parking lot, by the trailhead for China Cove. What a beautiful place. The cove (not pictured) is an incredible green color. 


The second painting of the day was done in Whaler's Cove. There's tons of poison oak here, so you've got to be careful. These rock outcroppings really intrigued me. I'll be painting these again for sure. 


Tuesday the convention ended at 4 (I'm disappointed it is being cut short each day for people to paint. At $1000 for a ticket, I would like more demonstrations than last year... not fewer!) I drove to the Asilomar beaches and knocked this one out. The weather got really cold and a fog started coming in. Every now and then a hole would open up in the sky and the sun would shine down on the water like a spotlight. Very cool.

On these paintings I used my "chromatic palette", which consists of: Titanium White (Utrecht), Cadmium Yellow Light, Cadmium Orange, Cadmium Red Light, Crimson Lake (Holbein), Dioxazine Purple, Ultramarine, Viridian Hue (Holbein), Brilliant Green (Utrecht), Yellow Green (Utrecht). 

This palette is all about using compliments to neutralize, rather than earth colors or black. I feel like I have the most control of my colors, because I can make color shifts as subtle as I want. This is especially valuable in mixing greys.

The one exception to this palette is the fourth painting, of the overcast/grey seascape. I received a free tube of Cadmium Red Deep from Richeson at the convention, and I also purchased a few Michael Harding oils here (I've been wanting to try them out for a while now, and finally I got some). This painting had the addition of four colors: Cadmium Red Deep in place of Crimson Lake, and Michael Harding Ultramarine, Raw Umber, and Burnt Sienna. I normally avoid earth colors, but I decided to give them a shot on such a grey day. 

The Cadmium Red Deep was used when mixing with Viridian Hue. Cool reds and cool greens mixed together get neutral purples/blues, and you can bend the mixture more to the green or more to the red side. It's really great for painting the Pacific ocean. Cadmium Red Deep is lower in intensity than Crimson Lake, and a little warmer. The mixture with Viridian Hue is a bit more blue and less intense. Crimson+Viridian yields more intense colors, and the middle mixture tends to be very purple. For a painting filled with neutral tones, I went with Cadmium.

That's it for now. Stay tuned for more...


Sunday, March 30, 2014

Making Your Own Belgian Linen Panels


The Plein Air Convention in Monterey is coming up soon, and I've found myself making more linen panels in preparation. Here's a simple tutorial for making your own.

Many companies make some great linen panels, but they're too expensive for me. While the initial cost of buying a full roll of linen can be steep, making your own panels will be much less expensive in the long run.

Materials:

-Claussen's Oil Primed Linen (I use the #12 style)
-MDF or Masonite boards, cut to size (Having a couple small sizes helps you minimize scraps)
-Matte Medium, Miracle Muck Glue, or Elmer's Glue
-Cheap bristle brush
-Soft Rubber Brayer (Speedball brand. Used for printmaking)
-Rubberized Cutting Mat
-Sandpaper
-X-Acto Knife
-Pencil
-Scissors


Begin by lightly sanding your wooden panels. I like to make sure the edges are cleaned up and any burs are removed. Run the sandpaper across the side to be glued as well, to provide better adhesion for the glue.

Next, lay your roll of linen out on the floor, primed side up. Place the panels on top, and trace all around with a pencil. Make a little bit of extra room all the way around (1/8 of an inch is plenty). Cut out with scissors.


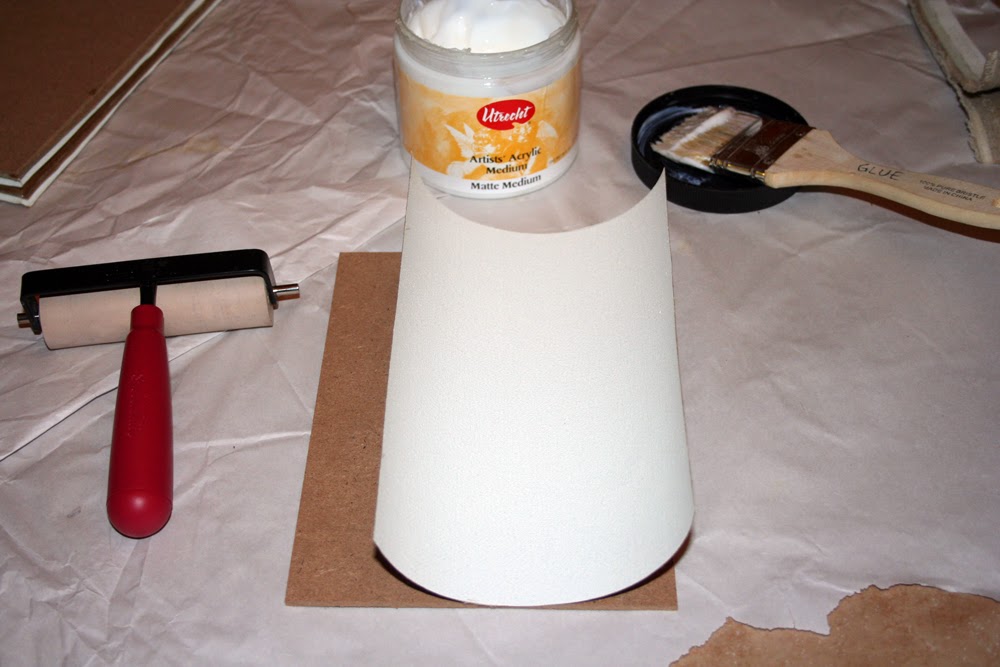
Next, gather your brush, medium/glue, and brayer.


Brush a thin layer of glue all over the wood. It took me a dozen panels to find out the magic amout of glue to use. Too little glue and the linen won't stick. Too much glue and it oozes out the sides and makes a mess.


With the panel coated in glue, carefully place the unprimed side of the linen down on to the panel. Try to line it up correctly on the first try. If you peel it up you will have to put down some more glue.

Take the brayer and firmly press down, rolling from the center outwards. Make sure to really get the edges to stick down. If you don't use enough glue and pressure the edges have a habit of peeling away from the board.


Flip your panel upside-down and inspect the edge. Make sure the linen is not peeling up anywhere.

Notice a little seam of glue on the edge. The panel below has just the right amount of glue. The edges will stick down well. Too much glue will ooze out and make a big mess on your working surface (and potentially get on the primed side of your linen panels!)


Take all of your panels at this stage and stack the like-sizes together. Place a couple heavy books on each stack. Let this sit overnight to dry.

Once the panels have dried, take your rubberized cutting mat and an X-Acto knife. Place the panel upside down on the cutting mat. With firm pressure and using the edge of the wood panel as a guide, cut away all the extra linen.


Panels can sometimes warp very slightly, because the linen can shrink as it dries. If this happens, place the panels face-to-face and leave underneath a couple heavy books for a few days. Time is better than pressure when it comes to de-warping wood.

After trimming off the extra linen, inspect each panel. If you have an edge or corner peel up because you didn't use enough glue, it's ok! Peel the corner back just a little bit, and put on some extra glue with a small brush or palette knife. Run the brayer over the trouble spot a couple more times until it really sticks down. Leave the panel under a book for another day.


 And there you have it. Hopefully this little tutorial can help you make some nice panels. Happy painting!